Posts

Citrus Minted Melon

Citrus Minted Melon

This recipe is perfect for the heat of summer when crisp, sweet melon is paired with the cooling freshness of mint and mouthwatering effects of fresh lime.  I also love bringing this dish to a summer barbeque as a delicious, yet simple recipe.

I always have mint growing in the garden at this time of year.  The kids love running over and picking a leaf to munch on while playing outside. I enjoy watching them chew on the various herbs in the garden; mint being their favorite in addition to lemon balm.

Lemon balm is also in the mint family and would be a delicious addition to this dish along with lemon thyme.   Mint is cooling and helps with most stomachaches and can be invigorating to the brain in the essential oil form.  Lemon balm is relaxing to the nerves and perfect for unwinding after a long day in a glass of iced tea. All these herbs are easy to grow.  I recommend growing mint and lemon balm in a pot as they will take over your entire garden if given the opportunity.  I don’t mind having extra mint, so I let it roam at will in my garden.

Mint is one of those herbs that will root itself if you pick a sprig and put it in a vase.  I love mint also for flower arrangements in my summer bouquets.  It will last for a few weeks and by then will have rooted itself.  I often will send my guests home with a fresh bouquet of herbs from my garden so they can plant the mint, sage and rosemary in their gardens in a few weeks.  I especially love this because the plants I have now are ones that my mother originally planted in our garden when I was a child over 25 years ago.  It is so satisfying to send my friends home with a piece of my family history.

How do you pick out a great watermelon? My mom and Kansas-born father taught me how to pick out a good watermelon.  You want the watermelon to sound snappy when you slap it.  It will sound resonant and crisp versus a flat thud.  This is because a ripe, crisp watermelon has tight cells that hold in the juice of the melon.  If the watermelon is overripe the cells will start to degrade and get mushy therefore giving you that flat thud sound. I like to hold the watermelon in both hands.  Then with one hand I slap the melon and see if I get that resonant and crisp snappy sound and feel the vibration that travels through the tight, crisp cells to the other hand.  If it sounds dull and my other hand doesn’t feel a strong vibration I know I have an overripe melon.

Watermelon is rich in a phytonutrient called lycopene.  Lycopene is particularly important in cardiovascular health and some budding research has shown that lycopene may also be important in bone health.  In addition to lycopene,  watermelon has a rich source of an amino acid called citruline.  Citruline can be converted in our kidneys and other organ systems into arginine, which is particularly important in dilation of blood vessels, important in cardiovascular health.  Watermelon holds a power punch of Vitamin C, phenolic antioxidants and flavonoids to boot.  So sit back and create your summer memories with a crisp, sweet, minty and citrus rich bowl of watermelon.

Enjoy!

8 cups of watermelon, cut into cubes
2 large sprigs of mint, stems removed and thinly sliced
1 lime, juiced
Optional: vanilla salt or a dash of sea salt to contrast the sweetness and to draw the flavors of the fruit forward

  1. In a large mixing bowl, combine all ingredients. Gently combine the mint and lime with the watermelon by scraping the sides of the bowl and turning the ingredients inward and repeat several more times until ingredients are well combined.
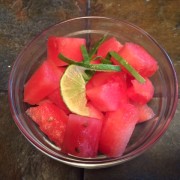
  2. Serve in a shallow clear, white or green serving bowl if you have one to allow the mint and bright red color of the watermelon to stand out.  No worries of you do not of course.


Coconut Milk Kefir

Coconut Milk Kefir

A major part of my practice involves nutrition counseling on how to create a healthy digestive tract, which in turn typically results in increased vitality.  I have always encouraged my patients to increase probiotics in their daily lives.

Probiotics are important to our health for many reasons.  Probiotics help to maintain a healthy balance of good bacteria that prevent disease causing bacteria and yeast from becoming too prolific in our gut.  They also increase our ability to absorb nutrients such as B vitamins and calcium from our food.  I typically will start with a quality probiotic in supplement form if there is a history of multiple antibiotic use, digestive complaints, food sensitivities, and a history of yeast or fungal infections.  While they are increasing their probiotics in supplement form, I then counsel them on getting their probiotics from food sources, namely fermented foods.  I love to incorporate nutrition from whole food as a practical way to reduce medication and supplement dependency.

Fermented foods are not widely consumed in our culture, no pun intended.  Major sources of fermented foods include kefir, sauerkraut, kombucha and kimchi.  I have found that using a food source like kefir in my smoothies, salad dressings or dolloped on soup like my Robust Tomato and French Lentil soups, makes eating probiotic rich food practical.

I love kefir as it has significantly more strains of bacteria and yeast that can colonize the gut.  Though yogurt is a beneficial probiotic source, it has not been shown to colonize the gastrointestinal tract.  So when I want patients to have a power punch of probiotics, I use kefir.  I purchased my kefir starter from Body Ecology online.  You can also purchase kefir starter or kefir granules at most local health food stores or co-ops.  Begin with a couple of tablespoon of kefir to see how you tolerate this probiotic rich food.

Kefir traditionally is fermented cow or goat milk.  For individuals who do not tolerate dairy, an alternative can be useful.  I have found that some patients who are dairy intolerant can tolerate kefir.  This is usually because the lactose is greatly reduced through the fermentation process.  If you are a person that tolerates traditional kefir, I recommend that you continue to enjoy dairy kefir.  If you find that you react to dairy kefir, here is a simple and fast way to enjoy the health benefits of coconut kefir.

1 packet kefir starter
2 cans coconut milk

  1. In a medium saucepan, heat the coconut milk to 92 degrees Fahrenheit.  Be careful not to overheat as this will kill the starter and prevent the coconut milk from fermenting.
  2. Pour the warm coconut milk in a quart sized canning jar and add kefir packet.  Whisk until evenly blended and then place a lid on the jar.   Keep the kefir at 72-78 degrees Fahrenheit for 18-24 hours.  If you are in a warm environment this will be simple.  If you are in a cooler environment, I recommend doing this early in the morning when your heat is on and you can also put a warmed bean or rice bag around the kefir while intermittently warming the bag when it cools.  Gauge the temp based on the room temp from your thermostat and being careful not to overheat the bean or rice bag. You will know the kefir is done when you smell the coconut milk and it smells like yogurt and when you taste the kefir and it is tart and tangy.
  3. Once the kefir is complete, refrigerate it and enjoy over the next couple of weeks.  The kefir will continue to ferment but at a much slower rate in the refrigerator.  You will know when it is bad when it tastes sour and not tart and tangy fresh.  If  you want to make kefir from your kefir, I have found that one cup of coconut milk kefir is needed.  Just repeat the process with two cans of coconut milk and then add the one cup of coconut kefir to the warmed coconut milk to continue the process.  You will know when you need a fresh packet of kefir starter when your coconut milk  no longer ferments well.

Enjoy!

Deliciously Gluten, Dairy and Egg Free French Toast

Preheat oven to 350 deg. F

1 cup raw cashews or mix of raw nuts and or seeds of your choice
1 cup rice milk or milk alternative
1 1/2 tablespoon flax meal
1/2 teaspoon cinnamon
1/4 teaspoon nutmeg
1 teaspoon gluten free vanilla extract
4 slices gluten and egg free bread
  1. Lightly oil the bottom and sides of an 8×8 baking dish.
  2. In a food processor or high power blender combine the above ingredient, placing the bread to the side for later. Blend until smooth.
  3. Pour half the batter on the bottom of the baking dish and smooth evenly with a spatula. Place the bread in the dish and pour the remaining batter over the top of the bread and again smooth evenly covering the bread.
  4. Place the French toast in the preheated oven and bake for 20-25 minutes or until the top is lightly golden brown. Serve with all fruit jam and or maple syrup.


Amaranth Pudding

Amaranth Pudding

I love to make amaranth for a quick breakfast or dessert.  Amaranth is a gluten free whole grain that is native to Peru and was used extensively by the Aztecs.  According to the Whole Grains Council, amaranth has one of the highest protein contents among grains as well as being rich in minerals such as calcium, magnesium, potassium and iron.  I suggest amaranth to my patients for its rich source of protein to help with blood sugar control and as a good gluten free alternative.  I like to use organic canned coconut milk to make it more like a rich pudding after the amaranth has been cooked.  I suggest this to parents when their children need to gain weight or for prevention of weight loss in patients with such diseases as cancer.  To make a lighter version, just use light organic canned coconut milk or any other milk alternative such as almond, rice or hemp.

Enjoy!

Serves: 4

2 1/2 cups water
1 cup amaranth
1 cup canned coconut milk
3 medjool dates, pitted
fresh berries, apples, pears, nuts, seeds or unsweetened shredded coconut to garnish

  1. In a medium covered saucepan, bring the water and amaranth to a boil then reduce to simmer.  Simmer for 15 minutes or until the amaranth has absorbed the liquid.  Remove from heat.
  2. In a blender, combine the coconut milk and medjool dates and blend until smooth.
  3. Pour the blended coconut milk into the amaranth and combine until evenly blended.
  4. Garnish with the desired fruit, nuts,seeds or shredded coconut and serve.
Honey and Cinnamon Baked Pears

Honey and Cinnamon Baked Pears

This is a delicious and nutritious dessert.  It only takes a few minutes to prepare to boot!   The cinnamon is warming and great for blood sugar and digestion.  I leave the peel on the pears for extra fiber and texture.  If you have difficulty with yogurt, I like to substitute with a nut butter like cashew or macadamia.  For baby food, I would leave out the honey and just bake a ripe pear with a little cinnamon and orange juice.  I made this for Etta and she loved it!

Serves: 4

4 ripe Danjou pears, destemmed, cut in half and cored
4 tablespoons honey
2 teaspoons cinnamon
4 Tablespoons lemon juice, fresh squeezed
½ cup orange juice

  1. Preheat oven to 350 ⁰ F.  In a 9×13 baking dish, place pears face down.
  2. In a small mixing bowl combine the honey, cinnamon and lemon and orange juice and mix until evenly blended.  Pour over the pears and bake for 25-30 minutes or until the pears are tender.
  3. Serve face up with a dollop of Greek yogurt and honey and some raw walnuts.
Tony’s Perfect Protein Smoothie

Tony’s Perfect Protein Smoothie

In honor of my husbands birthday, I wanted to share one of the recipes he makes for me most mornings.  In addition to being a fast and delicious breakfast, smoothies can pack a powerful nutrient punch. I like to add chia seeds for their great source of omega 3 and 6 fatty acids, fiber, and protein.  If  you have a child or adult in the family that needs to gain weight, substitute canned coconut milk  for the rice milk.  Also, add avocado and more nut or seed butter to increase healthy fat to the shake.  Add other greens such as kale, Swiss chard and beet greens for a good source of iron, calcium, magnesium and Vitamin K.  If you have a high powered blender, put fresh greens directly into the blender after rinsing.  If you do not, just rinse the greens, dry them on a towel, chop them into 1 inch stripes and freeze.  Freezing the greens will cause the cells to expand and burst open, allowing for the greens to blend into a fine powder and also allows you to access the nutrients within the greens much easier.  I also like to add nutritional yeast or Brewer’s yeast buds for a great source of B vitamins and minerals.  Nutritional yeast is an excellent source of Vitamin B12 for those individuals who do not eat meat.

Enjoy!

Serving size: approximately 3 cups

1 1/2 cups unsweetened rice milk
1/2 cup frozen blueberries or mixed berries
1/2 bananna
1 cup packed fresh spinach
1 tablespoon chia seeds
1 tablespoon nut or seed butter of your choice
1 teaspoon nutritional yeast or brewers yeast buds if on hand

Blend all ingredients until smooth and serve.


Nutty Granola

Nutty Granola

I made this in 20 minutes this morning.  I quadrupled the batch and put a gallon jar away for the mornings I am on the go.  Granola is so forgiving and you can tailor it in so many ways.  I just received pecans from my Tante (aunt in German and Swiss) Meg in addition to the almonds, pumpkin and sunflower seeds I had on hand.  You do not have to have all these nuts or seeds.  Just substitute what you have to make up the difference.  Use olive oil instead of coconut if you do not have the latter on hand.  The nuts and seeds are a good fat and protein source that will keep you full longer than oatmeal alone.  Reduce the maple syrup if you need to keep glucose balanced.  Add fresh fruit rather than dried fruit to further lower the glycemic effect on blood sugars.
Enjoy!
Serving size: 6 cups
3 cups rolled oats
1 cup millet
1/2 cup chopped pecans
1/2 cup chopped almonds
1/2 cup sunflower seeds
1/2 cup pumpkin seeds
1 tablespoon cinnamon
1/2 teaspoon nutmeg
1/4 teaspoon ground ginger
1/2 teaspoon sea salt
1/2 cup melted coconut oil
1/2 cup maple syrup or honey
2 teaspoons pure vanilla extract
Modifiers
Raisins
Candied ginger
Dried currents
Dried cranberries
Dried cherries
Dried blueberries
Dried apricots
Shredded unsweetened coconut
Sesame seeds
  1. Preheat oven to 300 degrees Fahrenheit.  In a large mixing bowl combine all dry ingredients and mix until evenly blended.
  2.  In a medium bowl combine all wet ingredients and whisk until evenly blended.
  3.  Pour wet ingredients over dry ingredients and toss until evenly blended.
  4.  Pour the granola mixture onto a large baking sheet with sides and spread evenly.  Place in preheated oven for approximately 45 minutes.  Toss the granola every 15 minutes to bake evenly. Remove from oven and let cool.
  5. Toss in any modifiers before storing in a cool dark place. I would recommend approximately 1 1/2 cups total of all modifiers.
Luca’s Morning Glory Muffins

Luca’s Morning Glory Muffins

My son Luca loves to eat these in the morning or for a quick snack.  With so many healthy ingredients you are sure to enjoy delicious and cozy flavors.  I usually double the batch with recipes that have a lot of ingredients and that freeze well when baked.  I will freeze whatever is left over for a quick breakfast or snack.   I used almond meal, coconut flour and gluten free flour mix to increase the healthy fat and protein content.  I also used coconut crystals to eliminate sugar from the recipe, which helps to lower the glycemic effect on blood sugar.  Enjoy!

P.S. I know this recipe has a lot of ingredients!

1 cup almond meal
½ cup coconut flour
½ cup gluten free flour mix
2/3 cup coconut crystals
1 tablespoon baking powder
1 teaspoon baking soda
¾ teaspoon xanthan gum
2 teaspoons cinnamon
½ teaspoon nutmeg
¼ teaspoon sea salt
1 ½ cups shredded carrot
1 cup chopped spinach
½ cup unsweetened shredded coconut
½ cup pumpkin seeds or chopped walnuts
½ cup raisins
½ cup milk alternative such as almond, rice, hemp or oat if gluten free certified
½ cup canola oil or coconut oil
½ cup apple sauce
2 egg replacers
1 teaspoon pure vanilla extract

  1. In a large mixing bowl, combine the almond meal, flours, coconut crystals, baking powder and soda, xanthan gum, sea salt, cinnamon and nutmeg.  Blend all ingredients until evenly combined.
  2. In a medium bowl combine the remaining wet ingredients and blend until evenly combined.
  3. Make a well in the middle of the dry mixture and pour in the wet mixture.  With a rubber scrapper, fold the dry mixture into the wet until evenly combined.  Try not to over mix as the xanthan gum can become too gummy and will lead to a spongy muffin.
  4. Fill muffin pans to the top.  Bake for 20-25 minutes or until light golden.  You can also test if the muffins are done by poking the center of the muffin with a toothpick.  If raw dough is on the toothpick the muffin needs to be baked longer.